目前个人主要以使用 Next 主题为主,Next 主题比较活跃、更新频繁,升级完成后记录过程。
如果你从旧版本 Next 主题升级上来,请戳这篇 issues,相信会对你有所帮助:
https://github.com/next-theme/hexo-theme-next/issues/4
关于hexo一些问题,基本上可以在官网找到解决方案,如果找不到可以在插件github issues寻找解决方案。
https://hexo.io/zh-cn/docs/troubleshooting
hexo nextjs主题
个人已经更新到最新环境:
1
2
3
4
5
| hexo: 6.3.0
hexo-cli: 4.3.0
os: win32 10.0.22000
node: 16.18.1
nextjs:NexT version 8.16.0
|
插件使用:
1
2
3
4
5
6
7
8
9
10
11
12
13
14
15
16
17
18
| "hexo": "^6.3.0",
"hexo-bilibili-bangumi": "^1.8.8",
"hexo-deployer-git": "^4.0.0",
"hexo-excerpt": "^1.3.0",
"hexo-generator-archive": "^2.0.0",
"hexo-generator-category": "^2.0.0",
"hexo-generator-index": "^3.0.0",
"hexo-generator-searchdb": "^1.4.1",
"hexo-generator-sitemap": "^3.0.1",
"hexo-generator-tag": "^2.0.0",
"hexo-next-giscus": "^1.0.3",
"hexo-related-posts": "^1.5.1",
"hexo-renderer-ejs": "^2.0.0",
"hexo-renderer-marked": "^6.0.0",
"hexo-renderer-stylus": "^2.1.0",
"hexo-server": "^3.0.0",
"hexo-theme-next": "^8.16.0",
"hexo-word-counter": "^0.1.0"
|
每安装一款插件,测试一下,暂时没发现冲突。
建议新建多个目录进行初始化:
- 测试环境:blog-hexo-test
- 生产环境:blog-hexo-prod
测试正常后,备份到生产环境使用。
置顶插件
Next 主题自带功能(主题配置文件):
1
2
3
4
5
6
7
8
|
tabs:
sticky: true
transition:
tabs: false
labels: true
|
文章配置:
1
2
3
4
5
6
| title: MySQL数据库与Nacos搭建监控服务
date: 2023-03-30 22:15:05
sticky: 100
tags: nacos
categories:
- [中间件]
|
其它方式
你可以安装插件 pin-top
1
| npm install hexo-generator-index-pin-top --save
|
修改:post.njk:hexo\blog\themes\hexo-theme-next\layout_macro\post.njk
找到post-meta,追加如下判断
1
2
3
4
5
| {% if post.top %}
<i class="fa fa-thumb-tack"></i>
<font color="red">置顶</font>
{### <span class="post-meta-divider"> </span> ###}
{% endif %}
|
此处置顶放在最后面显示,如需调整,可以F12调试定位。
修改:blog\themes\hexo-theme-next\layout_partials\post\post-meta.njk
还可以在 post-meta.njk文件 找到post.date在下面加入,置顶就放在发表日期前面显示。
1
2
3
4
5
| {% if post.top %}
<i class="fa fa-thumb-tack"></i>
<font color="RED">置顶</font>
<span class="post-meta-divider"> </span>
{% endif %}
|
md文章追加top设置,两种方式:使用true,也可以使用数字7来代替,数字越大排序越靠前
主题颜色切换开关
安装插件
1
| npm install hexo-next-darkmode --save
|
next主题_config.yml加入如下配置
1
2
3
4
5
6
7
8
9
10
11
12
13
14
15
16
17
|
darkmode_js:
enable: true
bottom: '64px'
right: '32px'
left: 'unset'
time: '0.5s'
mixColor: 'transparent'
backgroundColor: 'transparent'
buttonColorDark: '#100f2c'
buttonColorLight: '#fff'
isActivated: false
saveInCookies: true
label: '🌓'
autoMatchOsTheme: true
libUrl:
|
友情提示:会与文章底部社交功能(follow_me)显示图片功能冲突,影响鼠标悬浮事件。
问题排查:与 hexo-next-darkmode 插件冲突
插件地址:https://github.com/rqh656418510/hexo-next-darkmode
版本:
1
| "hexo-next-darkmode": "^0.1.10"
|
卸载:
1
| npm remove hexo-next-darkmode
|
重启(清除缓存):
1
| hexo clean && hexo s -i 127.0.0.1 -p 4001
|
再次验证 follow_me 设置图片,鼠标悬浮事件正常。
希望对看到这篇博文的你有所帮助。
追加番剧 & 电视剧标签页
使用hexo静态博客,第一步少不了插件安装:
1
| npm install hexo-bilibili-bangumi --save
|
更新数据到本地json文件。
1
2
| hexo bangumi -u
hexo cinema -u
|
hexo 主站本身_config.yml(不是主题)配置文件做如下设置:
1
2
3
4
5
6
7
8
9
10
11
12
13
14
15
16
17
18
19
20
21
22
23
24
25
26
27
28
29
30
31
32
33
34
35
36
37
38
39
40
41
42
43
44
|
bangumi:
enable: true
source: bili
bgmInfoSource: 'bgmApi'
path:
vmid: '你的B站ID'
title: '追番列表'
quote: '一入编程深似海,从此节操是路人!'
show: 1
lazyload: true
srcValue: '__image__'
lazyloadAttrName: 'data-src=__image__'
loading:
showMyComment: false
pagination: false
metaColor:
color:
webp:
progress:
extraOrder:
proxy:
host: '代理host'
port: '代理端口'
extra_options:
key: value
cinema:
enable: true
path:
vmid: '你的B站ID'
title: '追剧列表'
quote: '一入编程深似海,从此节操是路人!'
show: 1
lazyload: true
srcValue: '__image__'
lazyloadAttrName: 'data-src=__image__'
loading:
metaColor:
color:
webp:
progress:
extraOrder:
extra_options:
key: value
|
新增番剧专题页面
1
| hexo new page "bangumis"
|
新增电视剧专题
hexo next主题_config.yml配置bangumis和cinemas:
1
2
3
4
| menu:
home: / || fa fa-home
bangumis: /bangumis/ || fa fa-th
cinemas: /cinemas/ || fa fa-th
|
改成二级菜单形式:
1
2
3
4
5
6
| menu:
home: / || fa fa-home
文娱:
default: /happy/ || fa fa-th
bangumis: /bangumis/ || fa fa-th
cinemas: /cinemas/ || fa fa-th
|
自己添加后,需要手动追加汉化。配置blog-hexo-test\blog\themes\hexo-theme-next\languages目录下的zh-CN.yml:
1
2
3
4
5
6
| title:
bangumis: 番剧
cinemas: 电视剧
menu:
bangumis: 番剧
cinemas: 电视剧
|
省略一些配置,在标题title和菜单menu追加汉化。
升级 & 排查插件冲突
查看版本
1
2
3
4
5
| hexo version
hexo 6.3.0
theme-next-js 8.16.0
npm 8.19.2
node: 16.18.1
|
对比hexo官方文档给出建议配置:https://hexo.io/zh-cn/docs/#Node-js-版本限制
| Hexo 版本 |
最低版本 (Node.js 版本) |
最高版本 (Node.js 版本) |
| 6.2+ |
12.13.0 |
latest |
| 6.0+ |
12.13.0 |
18.5.0 |
| 5.0+ |
10.13.0 |
12.0.0 |
| 4.1 - 4.2 |
8.10 |
10.0.0 |
| 4.0 |
8.6 |
8.10.0 |
| 3.3 - 3.9 |
6.9 |
8.0.0 |
| 3.2 - 3.3 |
0.12 |
未知 |
| 3.0 - 3.1 |
0.10 或 iojs |
未知 |
| 0.0.1 - 2.8 |
0.10 |
未知 |
排查方法
建议备份原始数据和配置文件。
使用 hexo g 出现 html 解析报错,部分分页页面出现问题,文章正常生成。感觉是:插件兼容性、标题过长或者链接失效问题,待排查。
初始化安装,排查插件冲突。
- 安装一款插件排查一次。
- 开启debug排查:hexo –debug
- 执行:hexo clean && hexo g
- 执行:hexo s
发现与很久没有更新的插件:html_minifier 发生冲突,安装后与hexo6.3.0有冲突,可能与next主题冲突,也可能是文章内容格式冲突。
分页出现某些页面出现解析错误,卸载html_minifier则正常生成blog和分页。
1
2
| npm install hexo-html-minifier --save
ERROR Render HTML failed: page/11/index.html
|
hexo-html-minifier很久没更新,建议使用替代品:html-minifier-terser
1
| npm install html-minifier-terser --save
|
hexo landscape主题
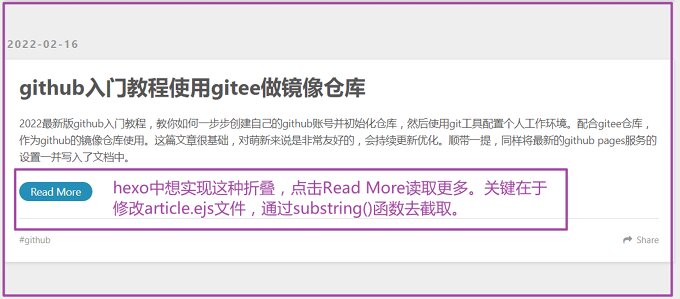
个人推荐使用 more 形式截断,优点控制更加精确:
hexo中实现首页文章折叠效果,通过修改article.ejs实现。初步使用,达到一个预期的效果图:
![]()
可以思考一下,各大互联网博客平台以及公众号平台它们所使用的摘要内容是如何实现的,同样也限定了输入的字数。公众号平台限制的摘要字数在120字,CSDN的摘要字数限制在256字,掘金社区限制摘要在100字。摘要的作用,是通过简短且精炼的语句描述出文章的中心思想,换句话说就是突出文章的主题,让读者一眼就能获取到自己想要的知识点。
hexo中实现首页文章折叠效果,通过修改article.ejs实现。
基于上面的思考,想出的解决办法,是通过截取去实现折叠效果。默认安装的主题本身是提供了开关,但并没有加入判断截取实现。
修改ejs文件
article.ejs目录
hexo这一层目录是自己新建的,article.ejs文件所在位置:
1
| \hexo\blog\themes\landscape\layout\_partial\article.ejs
|
默认主题原始article.ejs的read more设置:
1
2
3
4
5
6
7
8
9
10
11
12
| <div class="article-entry" itemprop="articleBody">
<% if (post.excerpt && index){ %>
<%- post.excerpt %>
<% if (theme.excerpt_link){ %>
<p class="article-more-link">
<a href="<%- url_for(post.path) %>#more"><%= theme.excerpt_link %></a>
</p>
<% } %>
<% } else { %>
<%- post.content %>
<% } %>
</div>
|
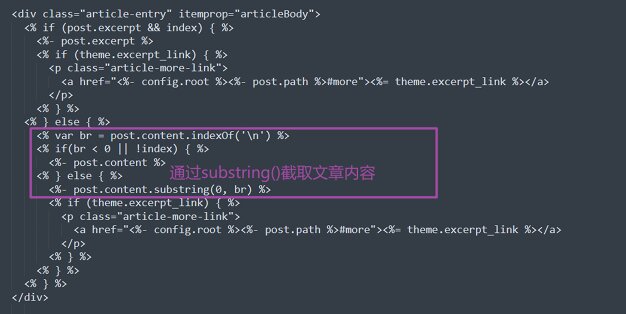
实现折叠方式一
通过加入判断以及substring()函数进行截取方法一:
![]()
1
2
3
4
5
6
7
8
9
10
11
12
13
14
15
16
17
18
19
20
21
22
| <div class="article-entry" itemprop="articleBody">
<% if (post.excerpt && index) { %>
<%- post.excerpt %>
<% if (theme.excerpt_link) { %>
<p class="article-more-link">
<a href="<%- config.root %><%- post.path %>#more"><%= theme.excerpt_link %></a>
</p>
<% } %>
<% } else { %>
<% var br = post.content.indexOf('\n') %>
<% if(br < 0 || !index) { %>
<%- post.content %>
<% } else { %>
<%- post.content.substring(0, br) %>
<% if (theme.excerpt_link) { %>
<p class="article-more-link">
<a href="<%- config.root %><%- post.path %>#more"><%= theme.excerpt_link %></a>
</p>
<% } %>
<% } %>
<% } %>
</div>
|
实现折叠方式二
下面给出的是一种实现方式,并没有给整体的代码。通过加入判断以及substring()函数进行截取方法二,可以针对上面进行改造ejs文件。你可以尝试加入几个判断语句,如果遇到代码块,看能否一样可以实现上面的折叠效果:
1
2
3
4
5
6
| <div>
<%else if post.excerpt%>
<%post.content.replace(/^\s*/, '').replace(/\s*$/, '').substring(0,140)%>
<%else%>
<% post.content.replace(/^\s*/, '').replace(/\s*$/, '').substring(0, 140)%>
</div>
|
测试read more
修改完后,可以直接在浏览器中打开进行测试:
个人搭建测试效果:
![]()
底部的版权修改
同样进入landscape主题下的layout目录找到footer.ejs:
1
| \hexo\blog\themes\landscape\layout\_partial\footer.ejs
|
对footer.ejs内容进行修改:
1
2
3
4
5
6
7
8
9
10
11
| <footer id="footer">
<% if (theme.sidebar === 'bottom'){ %>
<%- partial('_partial/sidebar') %>
<% } %>
<div class="outer">
<div id="footer-info" class="inner">
© <%= date(new Date(), 'YYYY') %> <%= config.author || config.title %><br>
<%= __('powered_by') %> <a href="修改成你的域名" target="_blank">填写作者名之类的</a>
</div>
</div>
</footer>
|
以上总结,仅供参考,希望对你有所帮助。
——END——